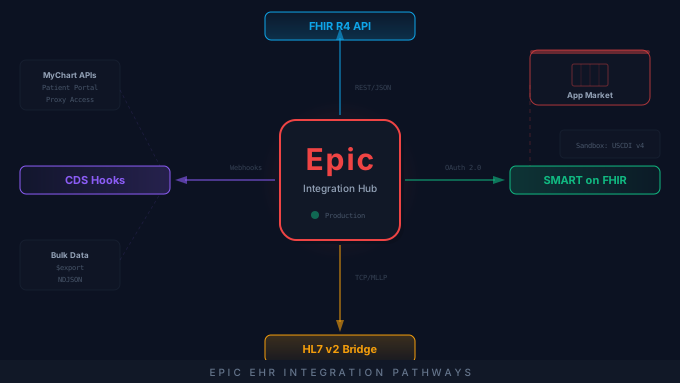
Epic Systems is the dominant electronic health record platform in the United States, holding over 42% of the acute care hospital market and covering nearly 55% of US hospital beds. When you add ambulatory clinics, specialty practices, and integrated delivery networks, the reach is even broader. For healthcare app developers, medical device manufacturers, health IT vendors, and health systems building custom workflows, integrating with Epic is not optional. It is a fundamental requirement.
This is an implementation reference for developers already building against Epic: what the FHIR R4 endpoint actually returns, how the SMART launch and its scopes behave, what Bridges puts on the wire, and how to test any of it in the sandbox. It assumes you are registered and have sandbox credentials. If you are earlier than that, weighing which surface to use or how an Epic engagement runs, start with Epic integration services.
What Epic Exposes, in One Paragraph
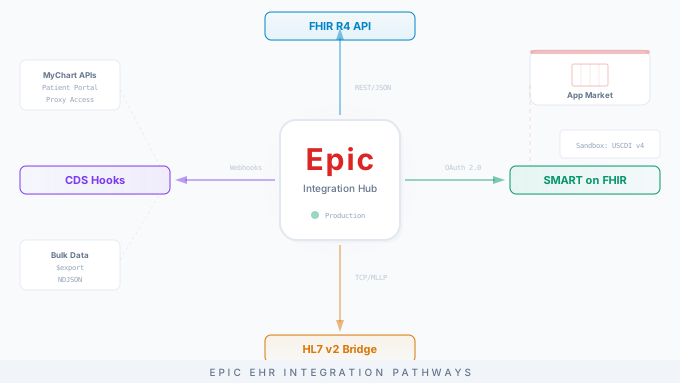
Six surfaces carry most Epic integration work, and the vendor catalog behind them is considerably larger than six: FHIR R4 APIs for modern read and write, SMART on FHIR for launching apps inside Hyperspace and MyChart, HL7 v2 through Epic Bridges for real-time clinical messaging, CDS Hooks for decision support at the point of care, MyChart APIs for patient-facing work, and Vendor Services plus Showroom as the registration and listing path. This guide is the implementation reference for the first four, and Where the FHIR API Runs Out covers the requirements that belong on a surface none of them reach. For which surface fits a given project, the buying decision, and how an engagement runs, see Epic integration services.
FHIR R4 APIs: Deep Dive
Epic’s FHIR R4 APIs are the foundation for modern integrations. They provide RESTful access to a comprehensive set of clinical and administrative resources.
Supported FHIR Resources
Epic supports a broad set of FHIR R4 resources. The most commonly used resources for clinical integrations include:
Core Clinical Resources:
| Resource | Description | Common Use Cases |
|---|---|---|
| Patient | Demographics, identifiers, contact information | Patient lookup, registration, matching |
| Observation | Lab results, vital signs, social history, assessments | Clinical data retrieval, trending, alerts |
| Condition | Active diagnoses, problem list entries, health concerns | Problem list management, risk stratification |
| MedicationRequest | Prescription orders, medication history | Medication reconciliation, drug interaction checks |
| AllergyIntolerance | Drug allergies, food allergies, environmental allergies | Safety checks, clinical decision support |
| Procedure | Surgical procedures, clinical procedures performed | Clinical history, care gap analysis |
| DiagnosticReport | Lab reports, imaging reports, pathology reports | Results delivery, report aggregation |
| Encounter | Inpatient admissions, outpatient visits, ED encounters | Utilization analysis, care coordination |
| DocumentReference | Clinical documents (C-CDA, PDF, notes) | Document retrieval, longitudinal record assembly |
Administrative Resources:
| Resource | Description | Common Use Cases |
|---|---|---|
| Practitioner | Provider demographics, identifiers, specialties | Provider lookup, scheduling, referrals |
| Organization | Facilities, departments, organizational units | Facility lookup, network management |
| Coverage | Insurance plans, subscriber information | Eligibility verification, prior authorization |
| Appointment | Scheduled visits, appointment details | Scheduling integration, patient engagement |
| Schedule | Provider availability, clinic schedules | Appointment slot discovery |
US Core Profiles
Epic’s FHIR resources conform to the US Core Implementation Guide, which constrains base FHIR resources to meet US regulatory requirements (primarily the ONC Cures Act Final Rule and USCDI). When building your integration, always reference the US Core profile for each resource rather than the base FHIR specification. US Core profiles define:
- Required data elements (must-support elements)
- Terminology bindings (which code systems to use for coded fields)
- Required search parameters
- Cardinality constraints (which fields are required vs. optional)
For example, the US Core Patient profile requires name, gender, and identifier, and defines must-support elements for race, ethnicity, and birthDate. Your application should be prepared to handle all must-support elements even if they are not always populated.
Endpoint Discovery
Epic uses the SMART Configuration specification for endpoint discovery. To find the FHIR endpoints and authorization URLs for a specific Epic organization:
- Start with the organization’s FHIR base URL (e.g.,
https://fhir.epic.com/interconnect-fhir-oauth/api/FHIR/R4/). - Retrieve the SMART configuration from
/.well-known/smart-configurationappended to the base URL. - The configuration document returns the authorization endpoint, token endpoint, supported scopes, and capabilities.
For sandbox development, Epic provides a public sandbox at https://fhir.epic.com/ where you can register a developer account and test against synthetic patient data without needing access to a production Epic environment.
Rate Limits and Best Practices
Epic enforces rate limits on FHIR API calls to protect system performance. While specific limits vary by organization and deployment, general guidelines include:
- Batch your requests. Use FHIR Bundle requests to combine multiple operations into a single API call where possible.
- Use
_includeand_revinclude. These search parameters allow you to retrieve related resources in a single query rather than making multiple round trips. - Implement pagination. Large result sets are paginated. Use the
nextlink in the Bundle response to retrieve subsequent pages. - Cache appropriately. Use HTTP caching headers (
ETag,Last-Modified) to avoid redundant requests for unchanged data. - Respect 429 responses. If you receive an HTTP 429 (Too Many Requests) response, implement exponential backoff before retrying.
Example API Calls
Search for a patient by name and date of birth:
GET /Patient?family=Smith&given=John&birthdate=1970-01-15Authorization: Bearer {access_token}Accept: application/fhir+jsonRetrieve lab results for a patient:
GET /Observation?patient={patient_id}&category=laboratory&date=ge2025-01-01Authorization: Bearer {access_token}Accept: application/fhir+jsonRetrieve active medications for a patient:
GET /MedicationRequest?patient={patient_id}&status=activeAuthorization: Bearer {access_token}Accept: application/fhir+jsonRetrieve a patient’s problem list:
GET /Condition?patient={patient_id}&category=problem-list-item&clinical-status=activeAuthorization: Bearer {access_token}Accept: application/fhir+jsonSMART on FHIR Authentication
Every FHIR-based Epic integration requires SMART on FHIR authentication. SMART (Substitutable Medical Applications, Reusable Technologies) defines a standardized OAuth 2.0 workflow for healthcare applications. There are three primary authorization patterns.
The sequence above is the EHR Launch flow specifically. Before walking through each pattern, it helps to see all three side by side. Epic supports three distinct SMART authorization patterns, and which one you use depends on who launches the app and whether an interactive user is present.
EHR Launch
In the EHR Launch flow, your app is launched from within Epic (typically from a toolbar button, activity, or embedded iframe). Epic initiates the launch by redirecting to your app’s launch URL with a launch parameter and the FHIR server’s iss (issuer) URL.
Step-by-step flow:
- Epic redirects to your app:
https://yourapp.com/launch?iss=https://epic-fhir-server/R4&launch=abc123 - Your app retrieves the SMART configuration from
{iss}/.well-known/smart-configuration - Your app redirects the user to Epic’s authorization endpoint with the
launchparameter, yourclient_id, requestedscope,redirect_uri, and astateparameter for CSRF protection - Epic authenticates the user (if not already authenticated in the EHR session) and prompts for consent if required
- Epic redirects back to your
redirect_uriwith an authorization code - Your app exchanges the authorization code for an access token (and optionally a refresh token) at the token endpoint
- The token response includes the
patientcontext (patient ID),encountercontext if applicable, and the scopes that were granted
Key advantage: In an EHR Launch, the patient and encounter context are provided automatically by Epic. Your app does not need to implement a patient picker: the clinician has already selected the patient in Epic.
Standalone Launch
In the Standalone Launch flow, your app launches independently (e.g., from a bookmark, mobile app, or external portal) and must discover the patient context on its own.
Step-by-step flow:
- Your app presents a FHIR server selection or has a preconfigured server URL
- Your app retrieves the SMART configuration from
{fhir_server}/.well-known/smart-configuration - Your app redirects the user to Epic’s authorization endpoint with
client_id, requestedscope(includinglaunch/patientto request patient context),redirect_uri, andstate - Epic authenticates the user and presents a patient picker (for clinician-facing apps) or uses the authenticated patient’s identity (for patient-facing apps)
- Epic redirects back with an authorization code
- Your app exchanges the code for an access token, which includes the selected patient’s ID
Backend Services (Client Credentials)
For server-to-server integrations that do not involve an interactive user session, Epic supports the SMART Backend Services authorization flow using the OAuth 2.0 client credentials grant.
Step-by-step flow:
- Pre-register your application’s public key with Epic through the Vendor Services portal during app registration. Modern Backend Services applications typically use a JKU (JSON Web Key Set URL) so that Epic can fetch the current public key at validation time. Check Epic’s developer documentation for the current requirements that apply to your specific integration.
- Your server creates a signed JWT assertion containing your
client_id, the token endpoint as theaud(audience), and the current timestamp - Your server sends the JWT to Epic’s token endpoint using the
client_credentialsgrant type withclient_assertion_typeofurn:ietf:params:oauth:client-assertion-type:jwt-bearer - Epic validates the JWT signature against your registered public key and returns an access token
- Your server uses the access token to make FHIR API calls
When to use Backend Services:
- Data synchronization and ETL pipelines that run on a schedule
- Population health analytics that process data for many patients
- Bulk data export operations
- System-to-system integrations where no user is present
Scope Management
OAuth scopes control what data your application can access. Epic supports the SMART scopes specification:
- Patient-level scopes:
patient/Patient.read,patient/Observation.read,patient/MedicationRequest.read, etc. These restrict access to data for a single patient. - User-level scopes:
user/Patient.read,user/Observation.read, etc. These allow access to data for multiple patients based on the authenticated user’s permissions within Epic. - System-level scopes:
system/Patient.read,system/Observation.read, etc. Used with Backend Services for server-to-server access. - Launch scopes:
launch(EHR Launch),launch/patient(Standalone Launch with patient picker) - Identity scopes:
openid,fhirUser,profile, used to obtain the authenticated user’s identity
Best practice: Request only the minimum scopes your application needs. Epic organizations can (and do) restrict the scopes available to each application, and requesting overly broad scopes may delay or prevent your app’s approval.
Token Refresh
Access tokens issued by Epic have a limited lifetime (typically 5-60 minutes, depending on the organization’s configuration). For sessions that need to persist beyond the token lifetime:
- Request the
offline_accessscope during authorization to receive a refresh token - Before the access token expires, send a refresh request to the token endpoint with the refresh token
- The token endpoint returns a new access token (and possibly a new refresh token)
- Store refresh tokens securely. They represent persistent access to patient data
Registration and Showroom, in Short
Every integration starts the same way: register at open.epic.com, build against the sandbox with a non-production client ID, then request production access, which issues a different client ID. Apps that will be discoverable by Epic customers go through Vendor Services certification and a Showroom listing on top of that.
The certification path, its review stages, and what the listing actually gets you are covered in Epic Showroom and App Orchard publishing. The rest of this guide assumes you are registered and working against the sandbox.
HL7 v2 Integration
Despite the momentum behind FHIR, HL7 v2 interfaces remain essential for many Epic integration scenarios. Epic Bridges is the module that manages HL7 v2 message routing, and it handles a massive volume of messages across Epic’s installed base.
ADT Messages (Admit/Discharge/Transfer)
ADT messages are the backbone of patient flow integration. Key message types include:
| Message Type | Trigger | Common Use Cases |
|---|---|---|
| A01 | Patient admission | Notify downstream systems of new inpatient |
| A02 | Patient transfer | Update room/bed assignments in ancillary systems |
| A03 | Patient discharge | Trigger discharge workflows, care transition notifications |
| A04 | Patient registration | Outpatient check-in, ED registration |
| A08 | Patient information update | Demographics changes, insurance updates |
| A28 | Add person | New person added to the MPI without an encounter |
| A31 | Update person | MPI record updates |
| A40 | Merge patient | Patient merge events for duplicate resolution |
ADT feeds from Epic are typically configured as outbound interfaces through Bridges. The receiving system connects via TCP/IP using the MLLP (Minimum Lower Layer Protocol) and must send HL7 ACK messages to confirm receipt.
Order Messages (ORM/OML)
Order messages flow from Epic to ancillary systems (lab, radiology, pharmacy) to communicate clinical orders:
- ORM^O01: General order message, used for lab orders, radiology orders, and other ancillary orders.
- OML^O21: Lab order message (newer HL7 v2.5.1 format that some labs prefer).
Order messages include the ordering provider, order details (tests requested, priority, specimen requirements), patient demographics, and insurance information. Your receiving system must parse these messages, execute the order, and return results.
Result Messages (ORU)
Result messages flow from ancillary systems back to Epic:
- ORU^R01: Unsolicited observation result. This is the primary message type for delivering lab results, radiology reports, and other diagnostic results back to Epic.
Result messages must include the patient identifier, order number, result values, units, reference ranges, abnormal flags, and result status (preliminary, final, corrected). Epic Bridges validates inbound ORU messages against the original order and routes results to the appropriate provider’s inbox.
Scheduling Messages (SIU)
Scheduling messages support bidirectional appointment synchronization:
- SIU^S12: New appointment notification
- SIU^S13: Appointment rescheduled
- SIU^S14: Appointment modified
- SIU^S15: Appointment cancelled
- SIU^S26: Patient did not show
These messages are critical for integrating external scheduling systems, patient engagement platforms, and resource management tools with Epic’s scheduling module.
Configuring Bridges Interfaces
Epic Bridges interfaces are configured by the Epic customer’s IT team (or with Epic’s assistance). Key configuration elements include:
- Connection type: TCP/IP with MLLP is the standard transport.
- Message format: HL7 v2.x (typically v2.3, v2.4, or v2.5.1, depending on the interface type and the Epic version).
- Filtering and routing: Bridges can filter messages based on message type, patient location, ordering department, and other criteria.
- Translation: Bridges can perform code translations (e.g., mapping Epic internal codes to external code systems like LOINC or CPT).
Integration Engine Routing
Most production Epic deployments route Bridges traffic through a Mirth-lineage integration engine (Mirth Connect 4.6+ commercial, OIE, or BridgeLink) that handles parsing, transformation, routing, and fan-out to downstream systems. Saga IT’s Mirth Connect and Open Integration Engine practices both regularly stand up Bridges-fed channel sets. We maintain Git-versioned channel deployment via the MirthSync CLI, and our OpenShare integration platform lets ops staff operate, share, and monitor those Bridges-fed channels across the whole fleet from one browser console. For the full engine-selection comparison, see our OIE vs BridgeLink vs Commercial Mirth Connect post.
For organizations with multiple HL7 v2 interfaces, an integration engine like Mirth Connect is commonly deployed between Epic Bridges and the downstream systems. The integration engine handles:
- Message routing to multiple destinations based on content
- Format translation between different HL7 v2 versions
- Code system mapping
- Error handling and message retry logic
- Audit logging and message archiving
MyChart Integration
MyChart is Epic’s patient portal, and it provides several integration pathways for patient-facing applications.
MyChart API Capabilities
- Appointment scheduling: Search for available appointments and book on behalf of the patient.
- Secure messaging: Send and receive messages between patients and care teams.
- Health records access: Patients can access their clinical data through FHIR APIs using the patient-facing authorization flow.
- Questionnaires: Deliver patient-reported outcome measures and intake forms through MyChart.
- Proxy access: Caregivers and legal guardians can access records for dependents.
Patient-Facing FHIR
For patient-facing apps, Epic supports the SMART on FHIR Standalone Launch flow with patient authentication through MyChart credentials. The patient authenticates directly (no clinician involved), and the app receives an access token scoped to that patient’s data. This is the pathway used for patient health record aggregation apps and personal health platforms.
Integration Considerations
- Patient identity verification. MyChart uses its own authentication, which may include multi-factor authentication. Your app must handle the full authentication flow, including potential MFA prompts.
- Data scope. Patient-facing apps can only access data that the patient would see in MyChart. Some clinical data may be withheld pending provider review (e.g., pathology results with a release delay).
- Proxy relationships. If your app supports caregiver access, you must handle MyChart proxy relationships correctly, including age-based access restrictions for adolescent patients.
CDS Hooks
CDS Hooks is a standards-based specification that enables external services to provide clinical decision support directly within the Epic workflow. When a clinician performs a specific action in Epic (such as opening a patient chart or signing an order), Epic calls your CDS service, and your service returns recommendations that are displayed inline. When those recommendations come from a model rather than a rule set, see our CDS Hooks AI integration services.
How CDS Hooks Work
- Hook trigger. Epic detects a workflow event that matches a registered hook (e.g.,
patient-view,order-select,order-sign). - Service call. Epic sends an HTTP POST request to your CDS service with context data (patient ID, encounter ID, draft orders, etc.).
- Card response. Your service processes the context data and returns one or more “cards”: structured responses that Epic displays to the clinician.
- Clinician action. The clinician can accept suggestions, dismiss cards, or launch a SMART app for more detail.
Hook Types
| Hook | Trigger | Use Cases |
|---|---|---|
patient-view | Clinician opens a patient chart | Risk scores, care gap alerts, medication reconciliation prompts |
order-select | Clinician selects an order | Drug interaction warnings, formulary checks, prior auth requirements |
order-sign | Clinician signs an order | Final safety checks, duplicate order detection, cost transparency |
encounter-start | New encounter begins | Protocol recommendations, screening reminders |
encounter-discharge | Encounter discharge initiated | Discharge checklist verification, follow-up scheduling prompts |
Card Response Structure
Each card returned by your CDS service includes:
- Summary: A brief, actionable headline (displayed prominently in Epic).
- Detail: Additional context in Markdown format.
- Indicator: Urgency level (
info,warning,critical) that controls the card’s visual presentation. - Suggestions: Actionable items the clinician can accept with a single click (e.g., “Add allergy to chart,” “Order recommended test”).
- Links: URLs that launch a SMART app or external resource for more information.
Implementation Considerations
- Latency matters. Epic expects CDS service responses within 500 milliseconds to 2 seconds. Clinicians will not wait for slow decision support. Design your service for low-latency responses with pre-computed data where possible.
- Card fatigue. Returning too many cards or low-value alerts leads to clinicians ignoring all CDS recommendations. Be selective about when you return cards and prioritize high-impact, actionable recommendations.
- Epic-specific behaviors. While CDS Hooks is a standard specification, Epic’s implementation has some specific behaviors. Epic also supports Best Practice Alerts (BPAs) as a native clinical decision support mechanism. For some use cases, a BPA may be more appropriate than a CDS Hook. Discuss the trade-offs with the Epic customer’s clinical informatics team.
Where the FHIR API Runs Out
Most Epic projects begin by assuming FHIR R4 covers the requirement, and for reads it usually does. The cases below are the ones that send teams looking for a different surface, generally later than they would have liked. None of them mean FHIR was the wrong starting point; they mean the requirement lives somewhere else.
Write is narrower than read. The set of resources Epic exposes for read is substantially larger than the set it accepts writes against, and write access is gated per customer and per resource rather than granted with the app. Confirm the specific writes your workflow needs against the specific organization before you design around them. A read-only prototype that works in the sandbox is not evidence that the write will be there.
Anything that has to hold a session. CDS Hooks fires at defined decision points and returns cards; SMART launches your app with context. Neither gives you a persistent channel into the user’s session, and neither lets you drive the desktop the clinician is already working in. Requirements phrased as “and then it should update the screen while they keep working” are outside both, and Epic’s real-time and in-workflow integration frameworks are where that conversation goes.
Cohort-sized extraction. Paging a FHIR search to assemble a population is the wrong tool, and at a few thousand patients it stops being viable at all. Bulk FHIR ($export) is the supported path for population-scale reads, with asynchronous kickoff and NDJSON output. Treat it as a separate integration with its own authorization and its own operational characteristics, not as a faster search.
Operational and administrative data. Registration internals, account and coverage structure, scheduling mechanics, device and printer identity, and a good deal of revenue-cycle detail were exposed through Epic’s pre-FHIR vendor web services and, in many cases, still are. Where a FHIR resource exists it is usually the better choice, but the older catalog is broader than FHIR in the administrative and operational corners, and a requirement that reads as “surely this is just a FHIR resource” sometimes is not.
Events pushed to you. FHIR is request and response. If the requirement is “tell us when something happens,” HL7 v2 through Bridges remains the mechanism most Epic organizations already have running, already monitor, and can extend fastest. Reaching for a polling loop against a FHIR search because HL7 v2 feels dated is the most common self-inflicted wound in this category.
The practical version: decide the surface from the interaction shape, not from which API you already know. Read-on-demand is FHIR, decision-point is CDS Hooks, in-workflow is a session-bearing surface, population is Bulk, and notify-me is HL7 v2.
Testing Your Integration
Thorough testing is critical for any Epic integration. Epic provides several tools and environments to support the testing process.
Epic Sandbox Environment
The public sandbox at fhir.epic.com provides:
- A FHIR R4 server with synthetic patient data
- SMART on FHIR authorization flows (EHR Launch and Standalone)
- A web-based EHR simulator for testing EHR Launch flows
- Pre-configured test patients with diverse clinical data
Register for a free developer account at open.epic.com to access the sandbox. The sandbox is the right environment for initial development and basic functional testing.
Test Patients and Scenarios
Epic’s sandbox includes test patients designed to cover common clinical scenarios:
- Patients with active medications, allergies, and problem lists
- Patients with recent lab results and vital signs
- Patients with multiple encounters and complex histories
- Pediatric patients (for testing age-specific logic)
- Patients with minimal data (for testing empty-state handling)
Design your test plan to cover both data-rich and data-sparse scenarios. Your app must handle missing data gracefully rather than crashing or displaying errors.
Inferno Testing
The ONC Inferno testing tool validates US Core conformance for FHIR servers and client applications. While Inferno is primarily aimed at FHIR server certification, it is also valuable for client developers to verify that their apps correctly handle US Core profiles. Run your app against Inferno’s test suites to catch conformance issues before submitting for Epic review.
Common Testing Pitfalls
- Hardcoded URLs. Never hardcode the FHIR server URL or authorization endpoints. Always use the SMART discovery mechanism (
.well-known/smart-configuration) to resolve endpoints dynamically. - Assuming data presence. Not all patients have all data types. Test with patients who lack allergies, medications, or problem list entries to ensure your app handles empty result sets.
- Ignoring pagination. Search results that exceed Epic’s page size are paginated. If your app does not follow pagination links, it will miss data.
- Token expiration. Test what happens when an access token expires mid-session. Your app should detect 401 responses and use the refresh token to obtain a new access token seamlessly.
- Scope restrictions. Individual Epic organizations may grant fewer scopes than you request. Test your app’s behavior when certain scopes are denied.
Where This Gets Used
The workflows these APIs end up serving (clinical data sync, population health feeds, patient engagement apps, revenue cycle, device and IoT data, decision support) are laid out with the Epic module each one lands in on our Epic integration services page.
Next Steps
Integrating with Epic is a significant technical undertaking, but the pathways are well-defined and the tooling is mature. Here is how to get started:
- Define your use case clearly. The right integration approach depends entirely on what you are trying to accomplish. A patient-facing app, a clinical decision support tool, and a data analytics pipeline each require different pathways.
- Register at open.epic.com. Create your developer account, set up your app registration, and start building against the sandbox. This costs nothing and gives you hands-on experience with Epic’s FHIR APIs.
- Choose your authorization pattern. EHR Launch for clinician-facing apps embedded in Epic, Standalone Launch for independent apps, Backend Services for server-to-server integrations.
- Build and test iteratively. Start with basic API calls in the sandbox, then add complexity. Test with diverse patient scenarios, including edge cases.
- Plan for Vendor Services and Showroom. If you are building a product for multiple Epic customers, begin the Epic Vendor Services registration and Showroom listing process early. The security review and certification process takes time.
Saga IT has extensive experience building Epic integrations across all of these pathways. Whether you need help with FHIR API development, HL7 v2 interface configuration, SMART on FHIR app authorization, or end-to-end integration architecture, our team can accelerate your project.
- Epic Integration Services: Our full Epic integration practice, from architecture through production support.
- FHIR API Integration: FHIR R4 development, US Core conformance, and Bulk Data implementation.
- EHR Integration: Cross-platform EHR integration for multi-vendor environments.
- HL7 Integration Services: HL7 v2 interface development, testing, and optimization.
- HL7 Workbench: Our free online HL7 message parser and validator for testing your HL7 v2 integrations.